> ## Documentation Index
> Fetch the complete documentation index at: https://docs.chatlevel.io/llms.txt
> Use this file to discover all available pages before exploring further.
# Typebot
> Connect WhatsApp to your Typebot chatflows with Chatlevel
## Configuration
In order to integrate Chatlevel with your Typebot chatflows, four steps are required.
1. Obtain an **API Key** in your Typebot account
2. Obtain your Typebot chatflow's **Start Chat URL**
3. Add the Typebot integration to your **Chatlevel account**
4. Link your **Typebot integration** to one of your devices
### 1. Getting your API Key from Typebot
Before you add the Typebot integration in Chatlevel, you should first obtain your **API Key** in your Typebot account.
Within **Typebot**, follow the below steps to obtain your **API Key**:
1. Navigate to your **dashboard**
2. Click **Settings and Members**
3. Click **My account**
4. Click **Create** under the **API tokens** section
5. Enter a name for the **API token**
6. Click **Create** token
7. Copy the **API token** displayed on screen
You will need this token while setting up the Typebot integration in Chatlevel.
The steps you see might be slightly different depending on changes within Typebot. [Check the Typebot documentation for updates.](https://docs.typebot.io/api-reference/authentication)
### 2. Obtaining your Chatflow's Start Chat URL
In order for Chatlevel to know where to reach your **Typebot chatflow**, you need to obtain your chatflow's **Start Chat URL**.
Within **Typebot**, follow the below steps to obtain your **Start Chat URL**:
1. Navigate to the **chatflow** you want to use with Chatlevel
2. Click **Share** *(see screenshot below)*
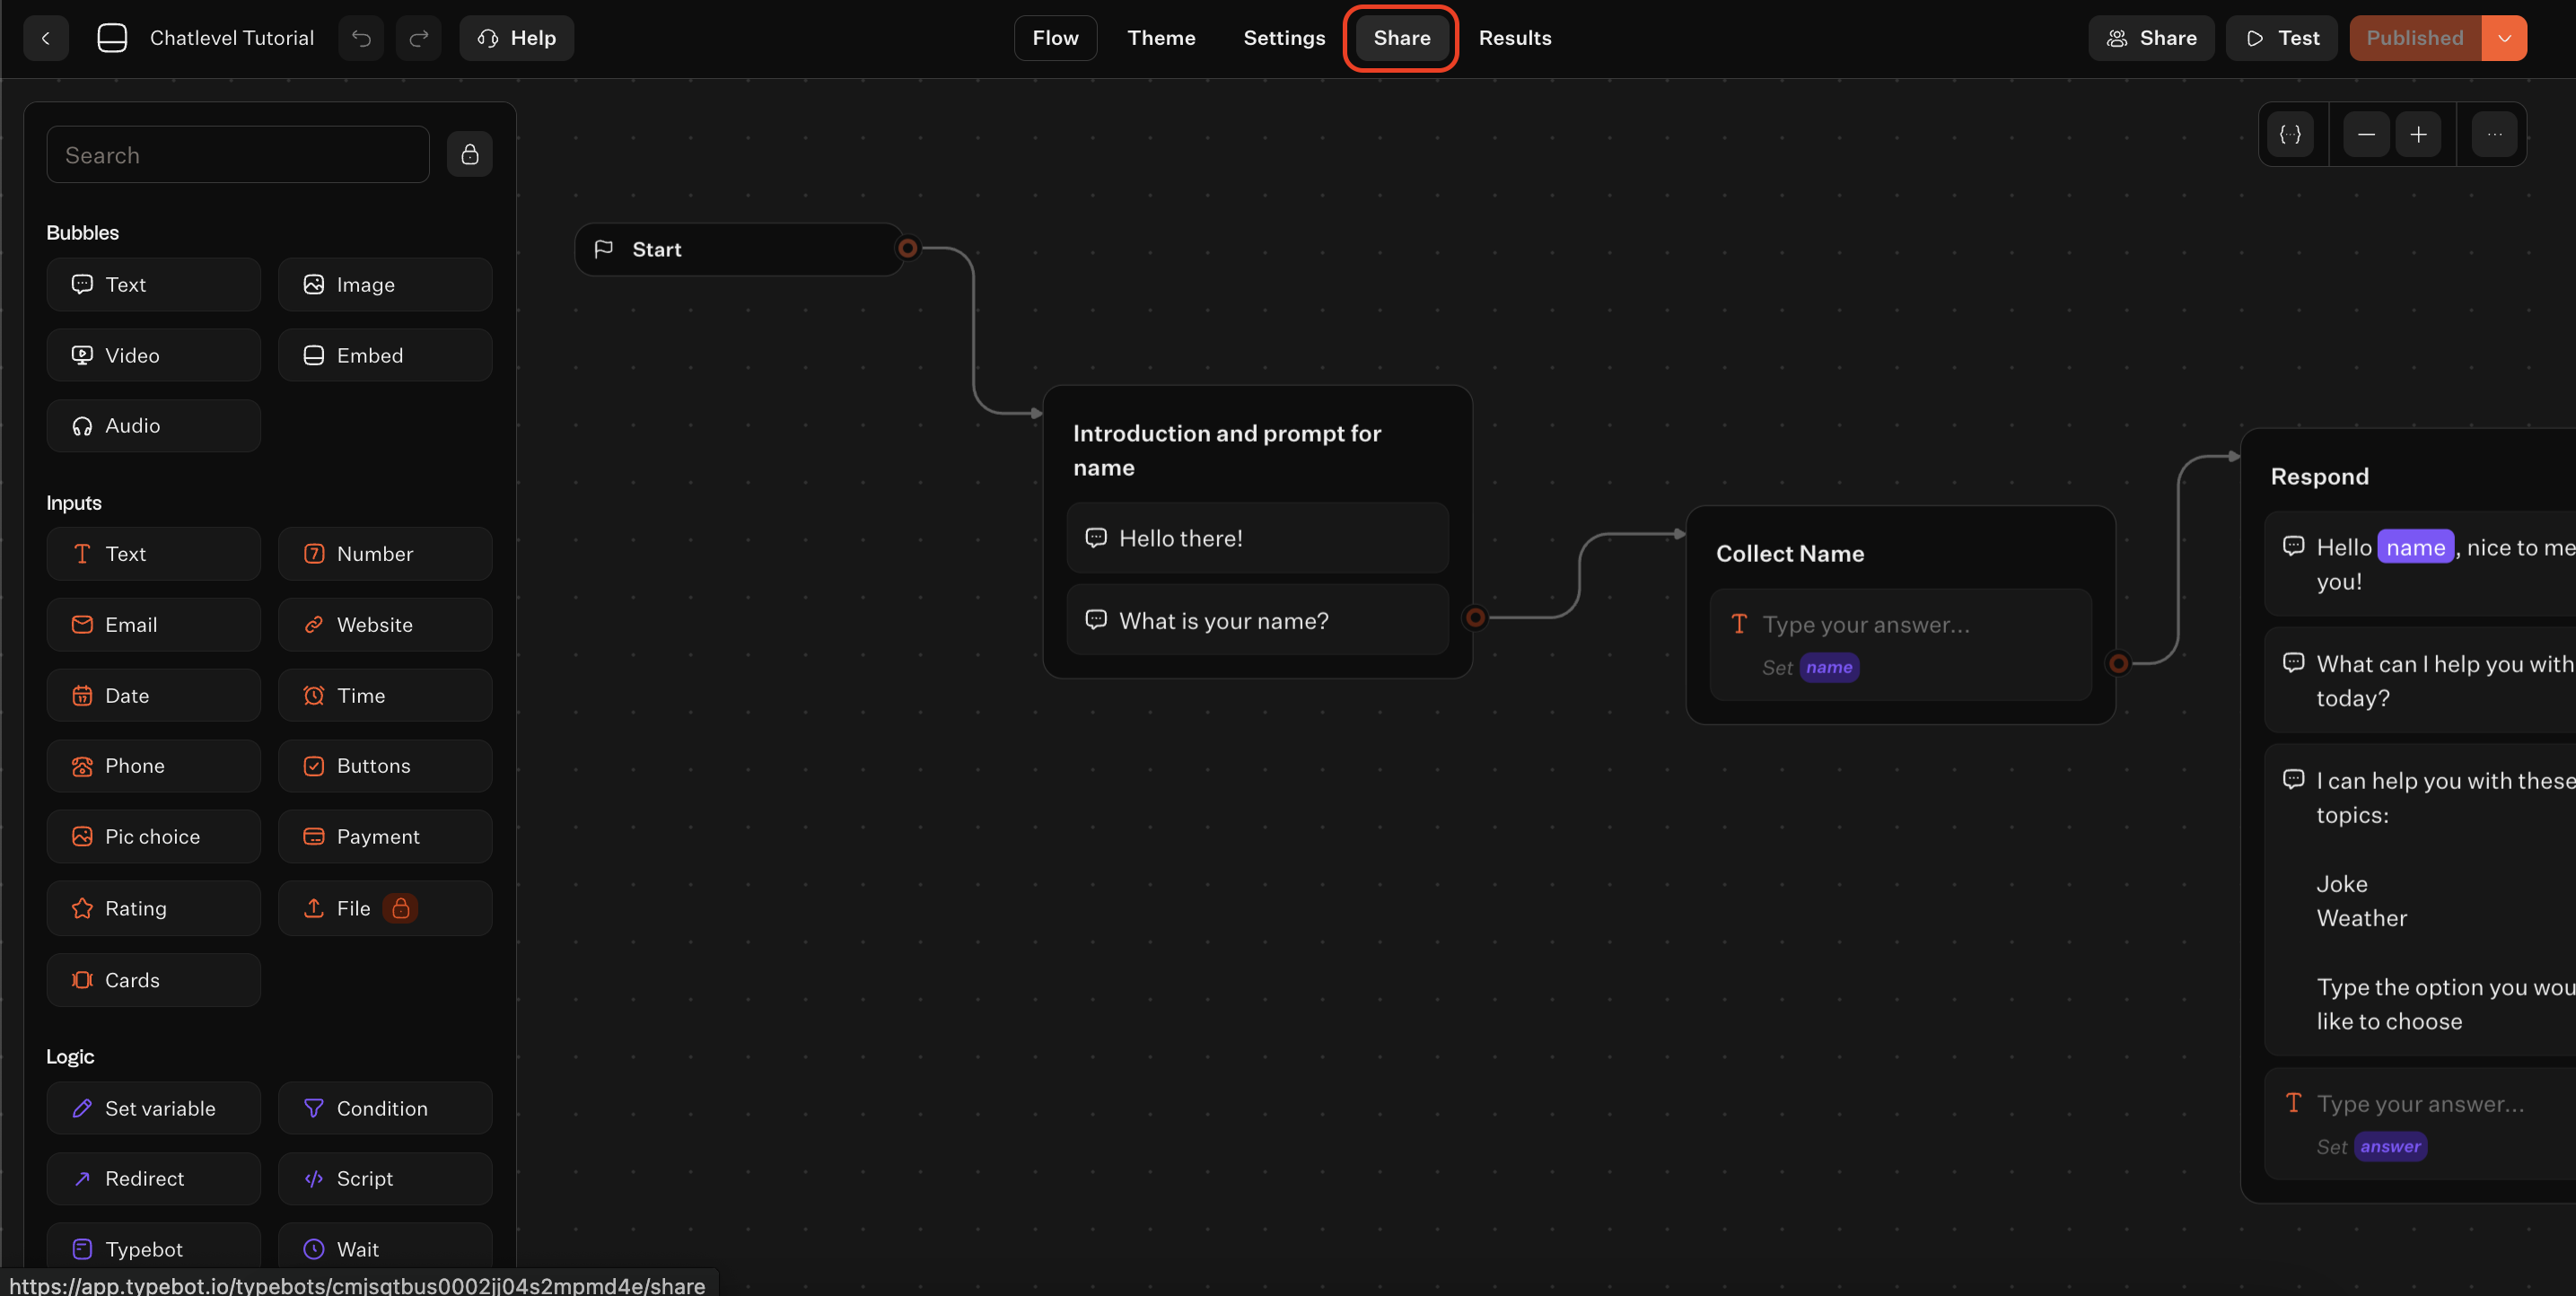 3. Click **API**
4. Copy the **Start Chat URL** *(see screenshot below)*
3. Click **API**
4. Copy the **Start Chat URL** *(see screenshot below)*
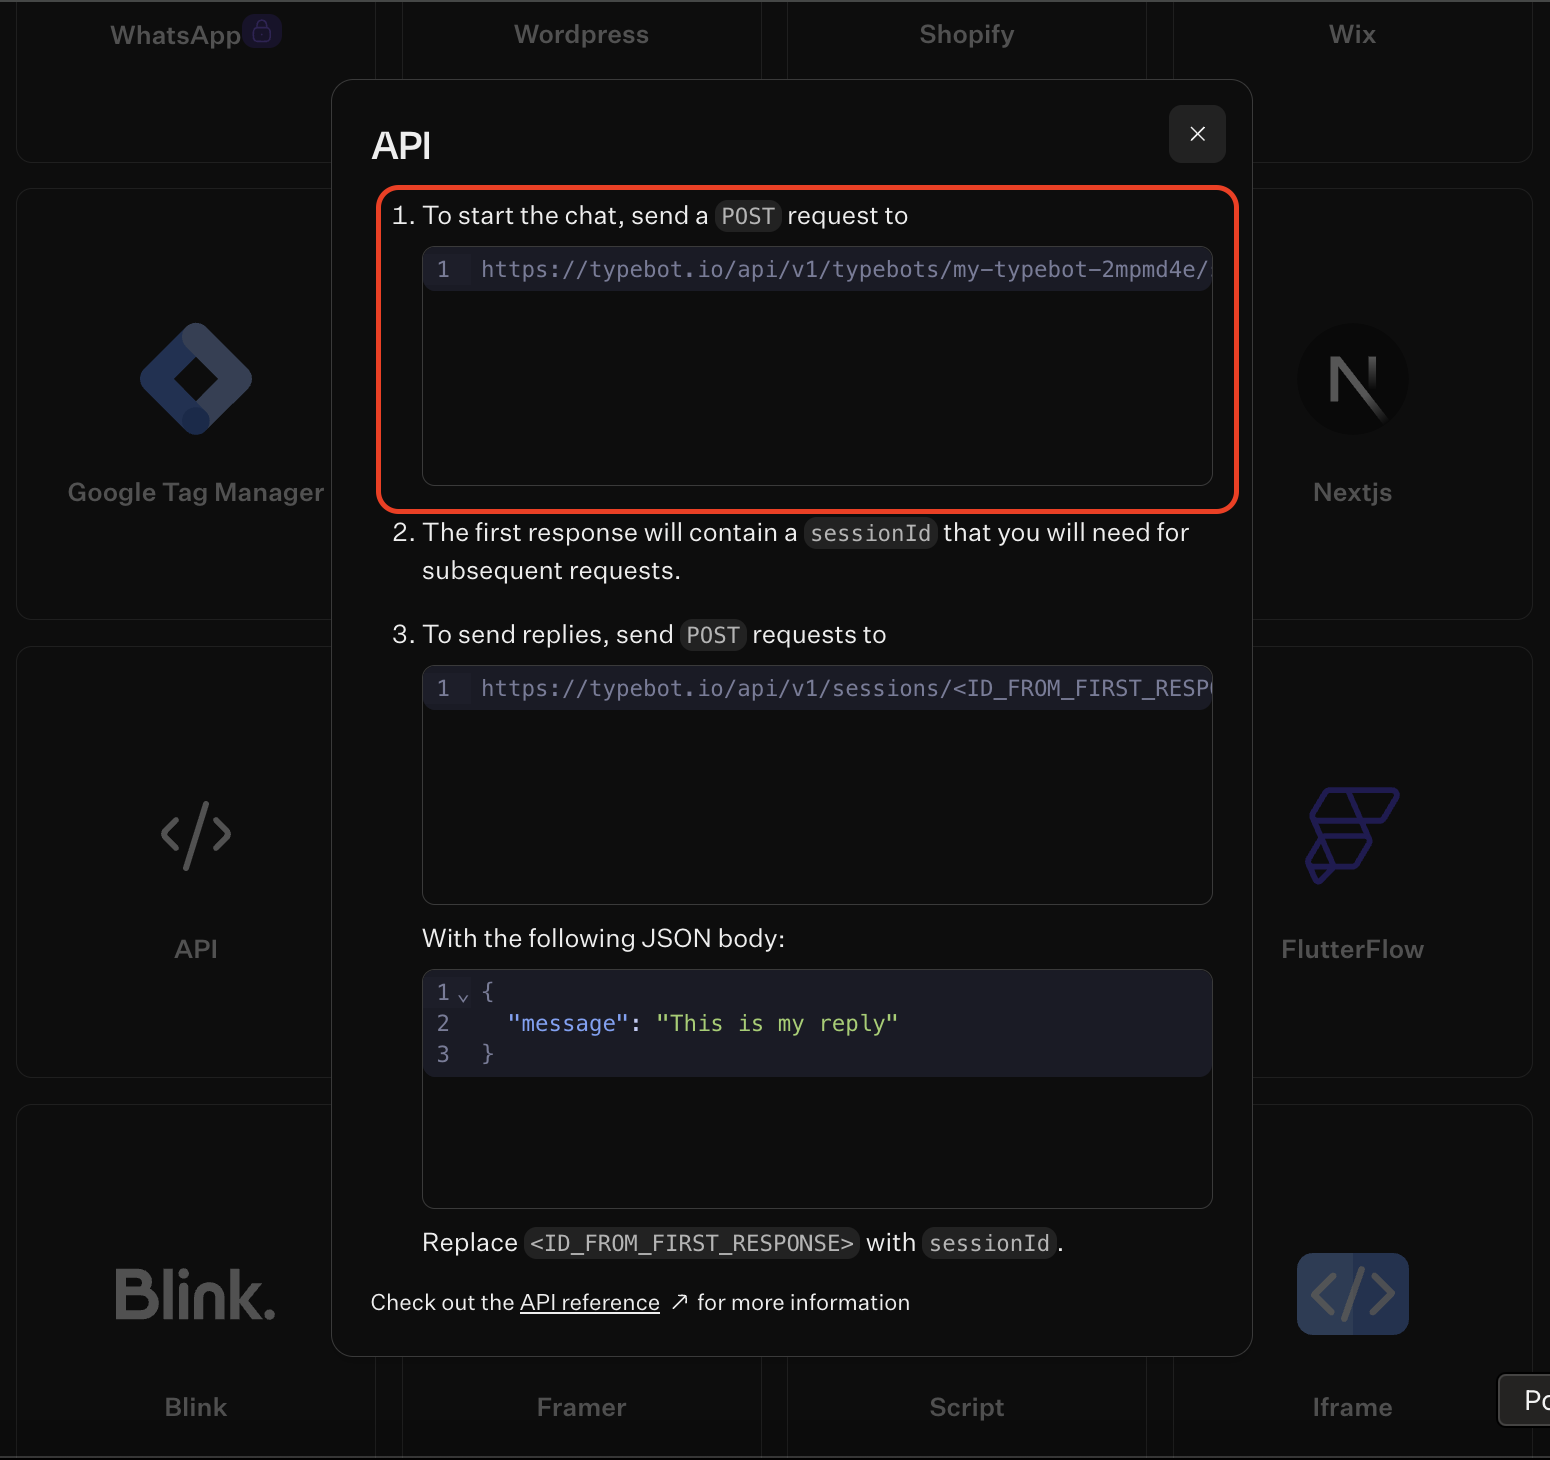 You will need this Start Chat URL while setting up the Typebot integration in Chatlevel.
### 3. Setting up the Typebot integration
Now that you have an API Key, we can add the **Typebot integration** to your Chatlevel account.
Within **Chatlevel**, follow the below steps to set up the **Typebot integration**:
1. Navigate to **integrations**
2. Click **Add integration**
3. Select **Typebot**
4. Assign a **name** to your Typebot integration
5. Insert the **Start Chat URL** *(*[*see section 2*](#2-obtaining-your-chatflow’s-start-chat-url)*)*
6. Under **Authorization**, add the **API Key** *(*[*see section 1*](#1-getting-your-api-key-from-typebot)*)*
Ensure that you include the full API Key including Bearer, i.e. *Bearer xxxxyyyyzzzz*
7. Set the **maximum duration** of a session
Chatlevel ends sessions automatically based on Typebot's API response, but if users don't finish the full Chatflow, the session will end automatically after this duration.
8. Click **Create**
Your Typebot integration is now set up. You will now need to link it to one of your devices.
### 4. Link Typebot integration to a device
Once you have a Typebot integration set up, you need to link your integration to one of your devices.
Within **Chatlevel**, follow the below steps to link your **Typebot integration** to a device:
1. Navigate to **Devices**
2. For the device you want to link, click the **Integration dropdown** *(see screenshot below)*
You will need this Start Chat URL while setting up the Typebot integration in Chatlevel.
### 3. Setting up the Typebot integration
Now that you have an API Key, we can add the **Typebot integration** to your Chatlevel account.
Within **Chatlevel**, follow the below steps to set up the **Typebot integration**:
1. Navigate to **integrations**
2. Click **Add integration**
3. Select **Typebot**
4. Assign a **name** to your Typebot integration
5. Insert the **Start Chat URL** *(*[*see section 2*](#2-obtaining-your-chatflow’s-start-chat-url)*)*
6. Under **Authorization**, add the **API Key** *(*[*see section 1*](#1-getting-your-api-key-from-typebot)*)*
Ensure that you include the full API Key including Bearer, i.e. *Bearer xxxxyyyyzzzz*
7. Set the **maximum duration** of a session
Chatlevel ends sessions automatically based on Typebot's API response, but if users don't finish the full Chatflow, the session will end automatically after this duration.
8. Click **Create**
Your Typebot integration is now set up. You will now need to link it to one of your devices.
### 4. Link Typebot integration to a device
Once you have a Typebot integration set up, you need to link your integration to one of your devices.
Within **Chatlevel**, follow the below steps to link your **Typebot integration** to a device:
1. Navigate to **Devices**
2. For the device you want to link, click the **Integration dropdown** *(see screenshot below)*
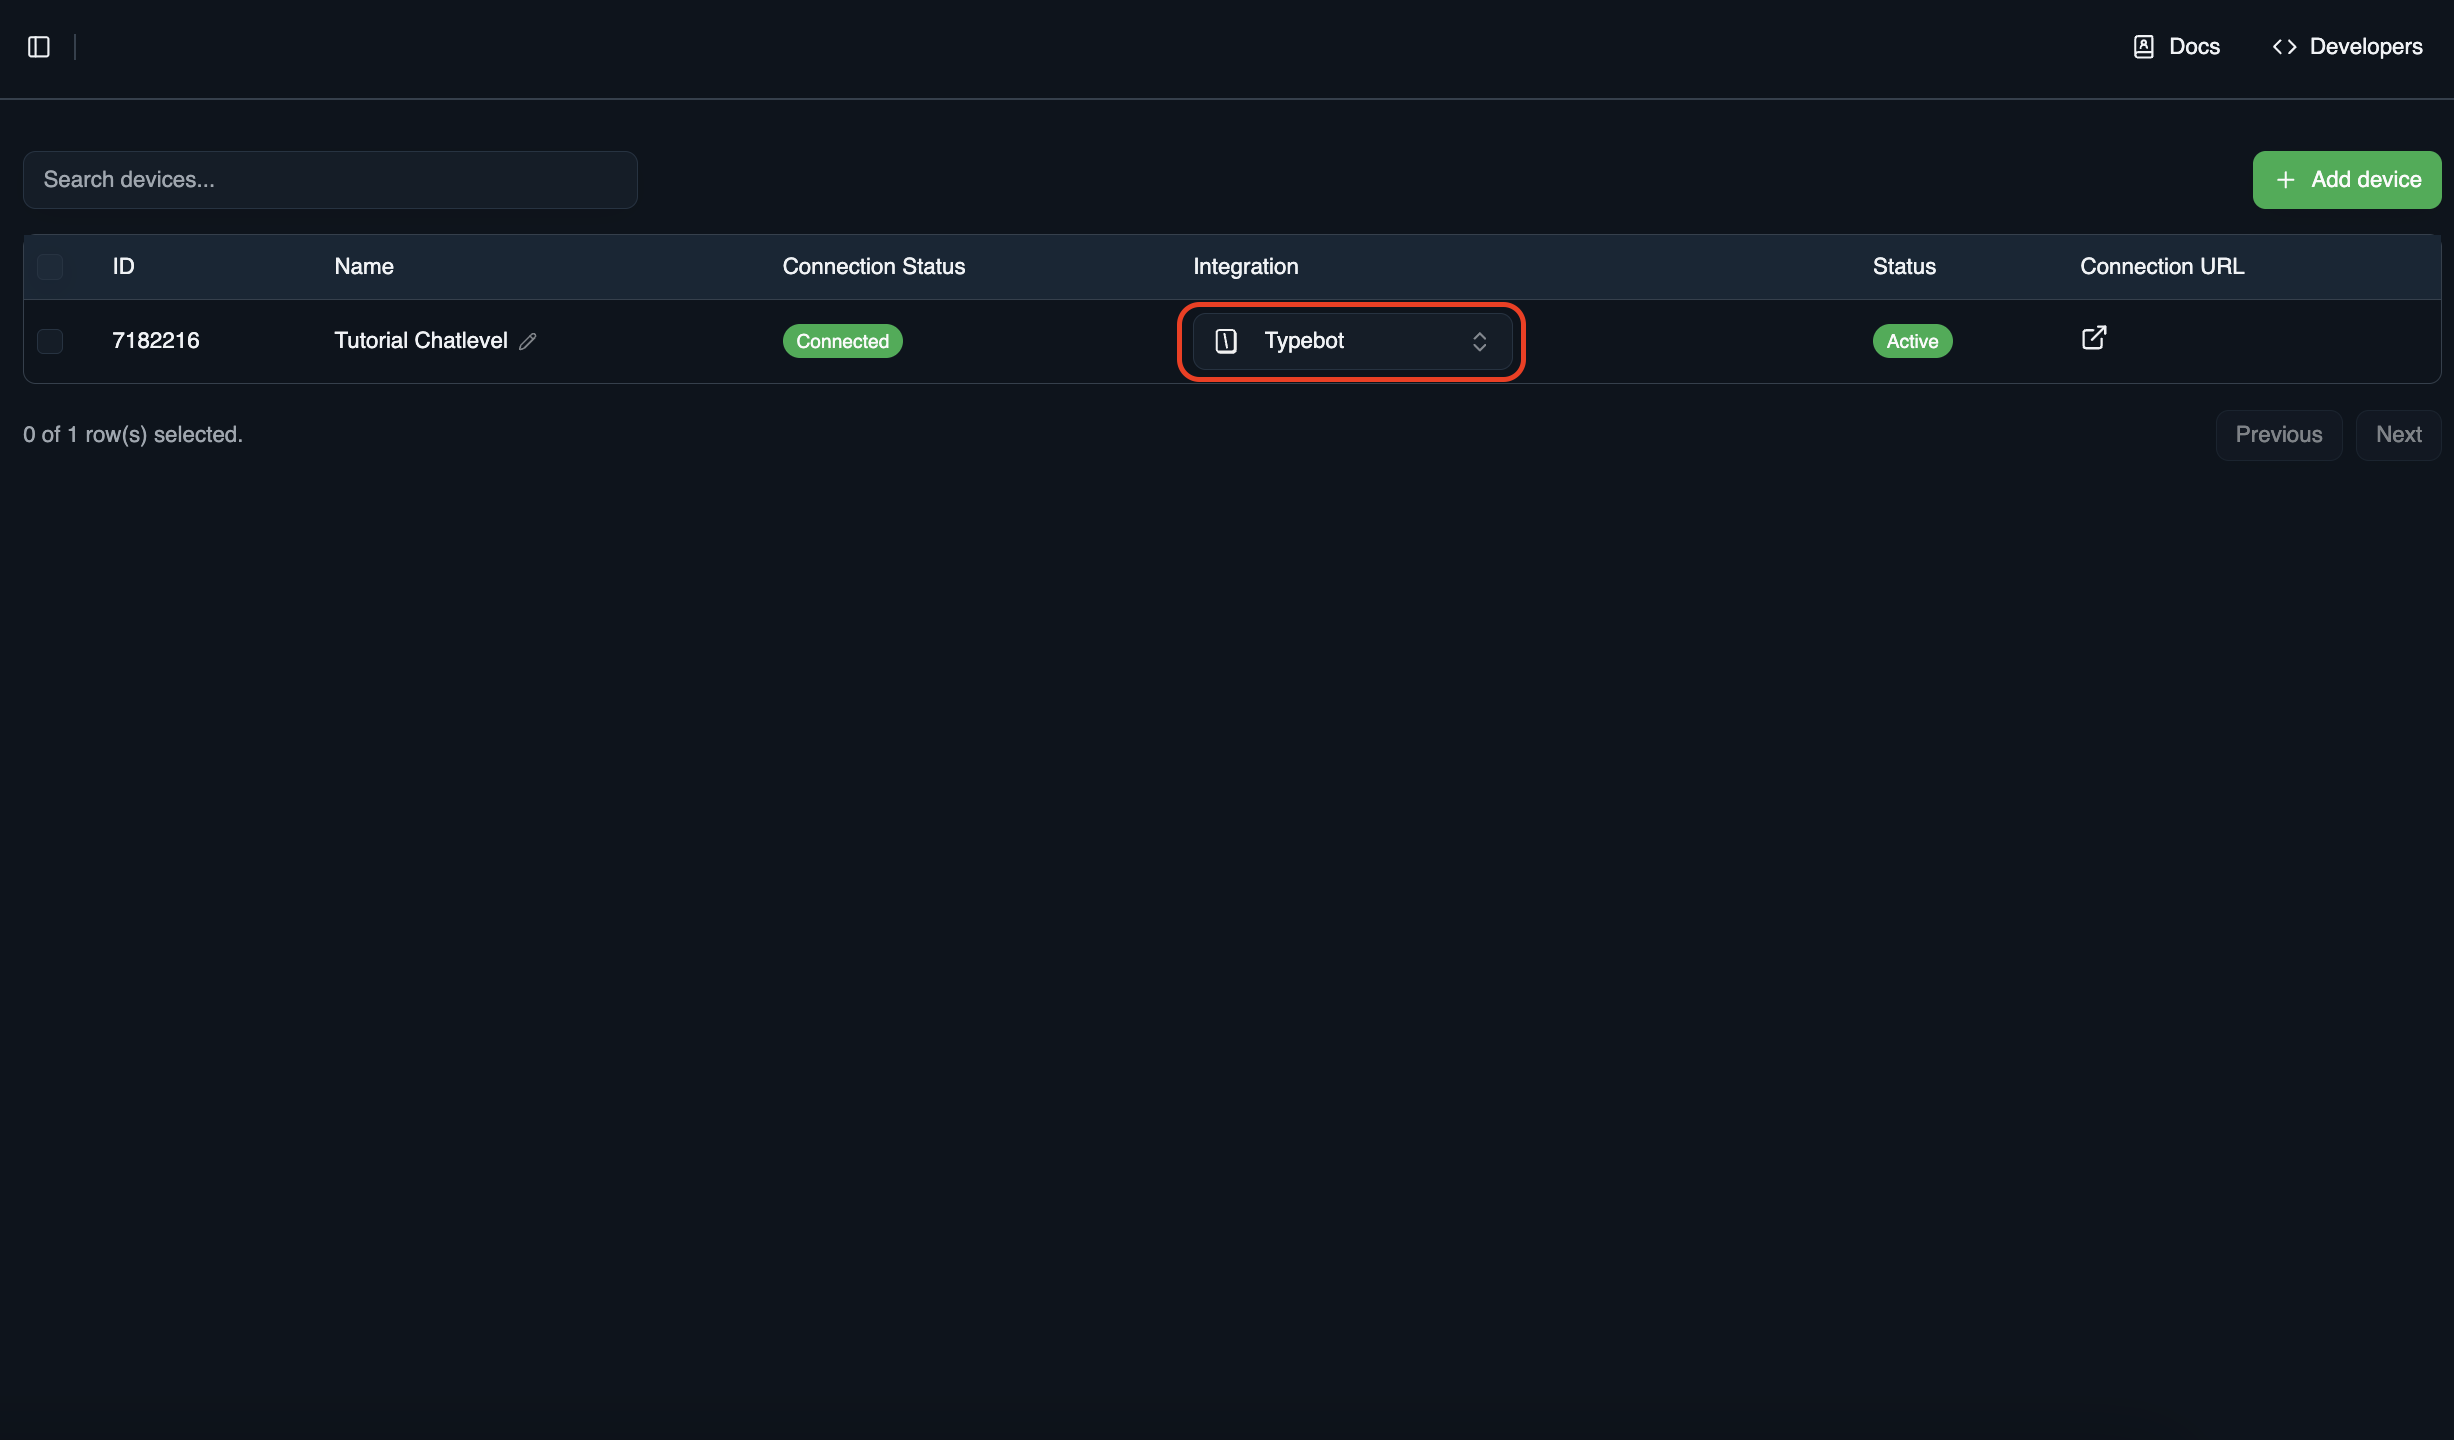 3. Select the **Typebot integration** you set up *(*[*see section 3*](#3-setting-up-the-typebot-integration)*)*
4. Done!
You have now linked your Typebot chatflow to Chatlevel.
## Usage
When using Typebot in combination with Chatlevel, a few things should be noted.
1. Chatlevel's Typebot integration currently only supports sending **text** **messages**. Images or other non-text messages will not be processed. We are introducing support for more message types soon.
2. Since Chatlevel allows you to use the normal WhatsApp API instead of the WhatsApp Business API, things like buttons are not available and will not work with Chatlevel. The normal WhatsApp API only supports plain messages and media.
If your Typebot Chatflow requires a user to pick out of multiple options, number them with 1) 2) 3) etc. and ask the user to respond with one of these numbers. You can then use [Typebot Conditions](https://docs.typebot.io/editor/blocks/logic/condition) to check which option the user selected.
For an example of how to build a Typebot Chatflow supported by Chatlevel, take a look at this [Chatflow Example](https://app.typebot.io/typebots/cmjsqtbus0002jj04s2mpmd4e/edit).
3. Select the **Typebot integration** you set up *(*[*see section 3*](#3-setting-up-the-typebot-integration)*)*
4. Done!
You have now linked your Typebot chatflow to Chatlevel.
## Usage
When using Typebot in combination with Chatlevel, a few things should be noted.
1. Chatlevel's Typebot integration currently only supports sending **text** **messages**. Images or other non-text messages will not be processed. We are introducing support for more message types soon.
2. Since Chatlevel allows you to use the normal WhatsApp API instead of the WhatsApp Business API, things like buttons are not available and will not work with Chatlevel. The normal WhatsApp API only supports plain messages and media.
If your Typebot Chatflow requires a user to pick out of multiple options, number them with 1) 2) 3) etc. and ask the user to respond with one of these numbers. You can then use [Typebot Conditions](https://docs.typebot.io/editor/blocks/logic/condition) to check which option the user selected.
For an example of how to build a Typebot Chatflow supported by Chatlevel, take a look at this [Chatflow Example](https://app.typebot.io/typebots/cmjsqtbus0002jj04s2mpmd4e/edit).